Troubleshooting Guide: How To Fix A Faulty Thermostat
Publish Date : 02-12-2024
Views : 1345
The majority of individuals in San Diego, California, rely heavily on the HVAC system for comfort and convenience throughout the hot summer months. A damaged thermostat, one of the crucial parts of the AC unit, might jeopardize the comfort, though. This may be annoying. What can you do in such a situation? This guide will provide a step-by-step guide on how to go about thermostat repair in San Diego and how to spot a faulty thermostat. It will also discuss how to fix a faulty thermostat so that your HVAC can get back to working efficiently. Continue reading to find out more!
Faulty Thermostat Symptoms
Finding the issue is the first step in a thermostat repair. Here are some typical faulty thermostat symptoms that show that it may be malfunctioning:Inaccurate temperature readings
If your thermostat is not displaying the correct temperature, it could be due to a faulty sensor or wiring issue.The system is not turning on
If your heating or cooling system is not turning on, it could be due to a problem with your thermostat.Frequent cycling
If your HVAC system is cycling on and off frequently, it could be due to a faulty thermostat.Uneven heating or cooling
If some areas of your home are colder or warmer than others, it could be due to a faulty thermostat. If you notice any of these symptoms, it's essential to troubleshoot your thermostat to determine the cause of the problem and start planning how to fix the faulty thermostat.How to Fix a Faulty Thermostat
Your heating or cooling system may experience many issues as a result of a broken thermostat, which can be frustrating to deal with.Also Read: how to fix a faulty thermostat
Step 1: Check the Thermostat Settings
The first step in troubleshooting a faulty thermostat is to check the settings. Even a minor mistake in the settings can cause the thermostat to malfunction. Here are the steps to check the thermostat settings:Check the temperature
Make sure the temperature is set to the desired level. If the temperature is set too high or too low, it can cause your HVAC system to work improperly.Check the mode
Check the mode setting on the thermostat. If you're trying to cool your home, make sure the thermostat is set to cool mode, and if you're trying to heat your home, make sure it's set to heat mode.Check the fan
Check the fan setting on the thermostat. Make sure it is set to "AUTO" mode if you want the fan to turn on automatically when the system is running, or set it to "ON" mode if you want the fan to run continuously. If you find any discrepancies in the settings, adjust them to the desired level. If the settings are correct, move on to the next step in troubleshooting your faulty thermostat.Step 2: Replace the Batteries
If your thermostat is battery-powered, low batteries can cause it to malfunction. Here are the steps to replace the batteries:Turn off your HVAC system
Before replacing the batteries, it's essential to turn off your HVAC system to avoid any electrical hazards.Remove the thermostat cover
Remove the thermostat cover by gently pulling it off the base.Replace the batteries
Remove the old batteries and replace them with new ones. Make sure to follow the correct polarity (+ and -) while inserting the batteries.Put the cover back
Once you have replaced the batteries, put the thermostat cover back on the base.Turn on your HVAC system
Turn on your HVAC system and check if the thermostat is working correctly.Step 3: Clean the Thermostat
Dirt and dust can accumulate on the thermostat sensors, which can cause them to malfunction. Here are the steps for cleaning the thermostat:Turn off your HVAC system
Before cleaning the thermostat, it's essential to turn off your HVAC system to avoid any electrical hazards.Remove the thermostat cover
Remove the thermostat cover by gently pulling it off the base.Clean the sensors
Use a soft-bristled brush or a cloth to gently clean the sensors on the thermostat. Be careful not to damage any wiring or components while cleaning.Put the cover back
Once you have cleaned the sensors, put the thermostat cover back on the base.Turn on your HVAC system
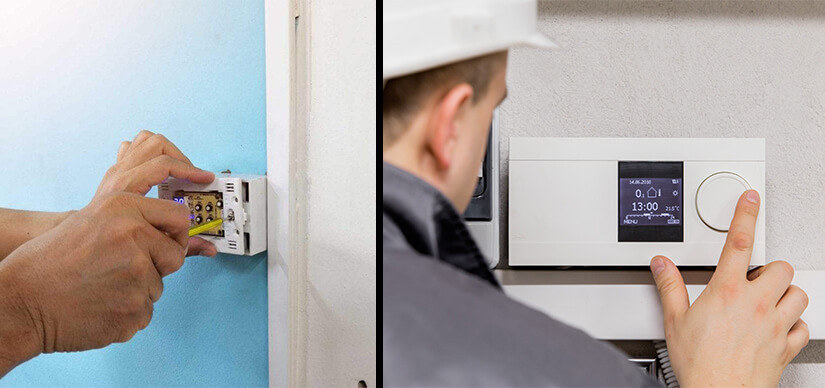
Turn on your HVAC system and check if the thermostat is working correctly.Step 4: Check the Wiring
If your thermostat is wired to your HVAC system, loose or damaged wiring can cause it to malfunction. Following are the steps to inspect the wiring:Turn off your HVAC system
Before checking the wiring, it's essential to turn off your HVAC system to avoid any electrical hazards.Remove the thermostat cover
Remove the thermostat cover by gently pulling it off the base.Check the wiring
Carefully check the wiring connections to ensure they are tight and not damaged.Tighten loose connections
If you find any loose connections, use a screwdriver to tighten them.Replace damaged wires
If you find any damaged wires, replace them with new ones.Put the cover back
Once you have checked and fixed any wiring issues, put the thermostat cover back on the base.Turn on your air conditioner. Verify to see if the thermostat is functioning well.
Step 5: Check the Circuit Breaker
If your thermostat is not receiving power, it could be due to a tripped circuit breaker. Follow the steps below to check the circuit breaker:Check the thermostat display
If the thermostat display is blank, it could be due to a tripped circuit breaker.Check the circuit breaker panel
Locate the circuit breaker panel in your home and check if any of the breakers have tripped.Reset the circuit breaker
If you find a tripped breaker, reset it by turning it off and then back on.Start your HVAC unit
Turn on your HVAC unit and check that the thermostat is operating properly.Step 6: Replace the Thermostat
If none of the above troubleshooting steps work, you may need to replace your thermostat. The steps to replace your broken thermostat are as follows:- Turn off the power to your HVAC system at the circuit breaker or fuse box.
- Remove the cover from your old thermostat and remove the mounting plate.
- Label the wires attached to the old thermostat so you can remember which ones go where.
- Remove the wires from the old thermostat's terminals and remove the old thermostat from the wall.
- Install the new thermostat mounting plate on the wall using the screws provided.
- Connect the wires to the new thermostat's terminals according to the labels you made.
- Attach the new thermostat to the mounting plate and install the cover.
- Turn the power back on to your HVAC system and test the new thermostat.